Mesh Shape
Intro
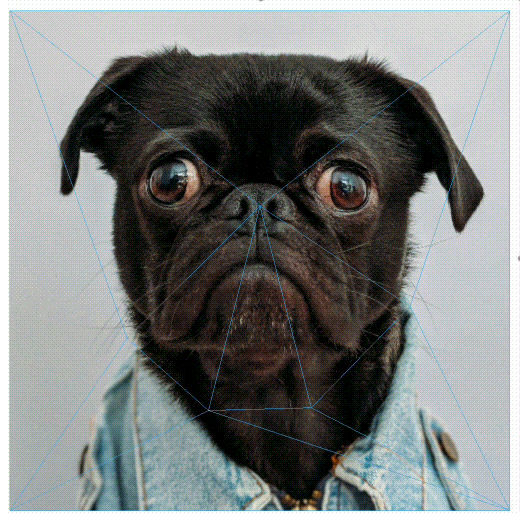
Create a mesh by adding control vertices to deform images or Shaders.
UI
- Shape
- Mesh
Size - Set the size of the Shape.
Mesh - When checked, the Shape is converted to a mesh and so can be deformed by adding vertices. See Mesh tool.
Top Left Offset - Set a position offset for the Shape's top left corner.
Top Right Offset - Set a position offset for the Shape's top right corner.
Bottom Left Offset - Set a position offset for the Shape's bottom left corner.
Bottom Right Offset - Set a position offset for the Shape's bottom right corner.
Vertices - Open a popover window containing a list of the mesh vertices:
 - Use this button to add more vertices to the mesh. See Mesh tool.
- Each index contains the position information for each vertex:
- Bind Position - Set the starting position for the vertex.
- Offset Position - Set values to offset the vertex's position from its Bind Position.
Use the x to remove a Vertex from the list.
Controllers - Add Falloffs which can be used to affect groups of vertices.
While a Falloff can be added as a Controller by right clicking in the Controllers list, it may be preferable to:
- Manually create a Falloff.
- Position it over the vertices to affect.
- Connect it to the Controllers input.
If a Controller is already bound to vertices:
- Click the active icon in the Controllers list to disable the Falloff.
- Move the Falloff.
- Click Rebind.
- Click the active icon in the Controllers list to enable the Falloff.
Right click on an image asset in the Assets Window and choose Add to Composition as Mesh to quickly add an image to a Mesh Shape.
Alternatively, drag an image from the Assets Window to the Shaders input of a Mesh Shape's Fill tab. A dialogue will appear asking if the Mesh Shape should be resized to fit the image asset's resolution.
- Import an image to the Assets Window.
- Right click on the image and choose
Add to Composition as Mesh. - Enable the Mesh tool.
- Click on the Mesh Shape to ensure it is selected.
- Hold Option/Alt and click in the centre of the Mesh Shape to create a vertex.
- Release Option/Alt and click and drag the vertex.
Offset Position keyframes can be set by either right clicking on a vertex and choosing Set Keyframe or via the Vertices popover.