Referencing
Intro
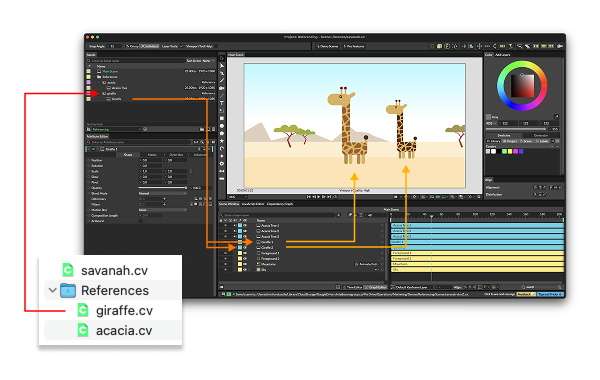
Import other Cavalry scene files (.cv) as 'Assets' and then use them as a 'Pre-Comp'. This enables multiple artists to collaborate on a project by breaking it down into smaller Scenes which can then be combined within a main Scene.
A Reference is simply a Cavalry Scene file (.cv) that has been imported to the Assets Window much like an image or video asset. A Reference can then be imported into several other Scene files and so any changes made to the original Reference are then reflected within those parent files.
UI
- Artboard - When checked, the Reference Composition's Composition Boundary is ignored meaning that, for example, a Shape within the Reference Composition will remain visible when it animates outside of its Composition Boundary. The Composition Background is also ignored.
Workflow
Import
Double click in the Assets Window and then select a .cv file to import another Cavalry Scene as a Reference. This will import the Scene file as an asset and reveal any Compositions contained within it. Note that Referenceable must be checked in the Composition Settings for a Composition to appear as a child of a Reference.
With a Project set, importing assets will default to the directory set for Assets. As .cv files used as References may have been saved to the directory set for Scenes, holding Shift when importing assets will default to that directory instead.
Overrides
Any attributes which have been set as a Pre-Comp Override will appear under the Overrides tab of a Reference Composition which has been imported into a Composition within another Scene. These can then be accessed via the Pre-Comp's Overrides tab and used to add variation to each Pre-Comp.
Open an imported Reference
Right click a Reference's parent in the Assets Window and choose Open Reference File... to open the .cv file for that Reference.
Create a 'reference' Scene:
- Create a Shape.
- Right click on Fill > Color and choose Add Pre-Comp Override.
- In the Assets Window, right click the Composition, choose Rename and rename it to 'Reference'.
- File > Save (
reference.cv)
Create a 'main' Scene:
- File > New Scene.
- File > Import Assets...
- Select the
reference.cvfile saved on step 5 and hit Open. - Drag the 'Reference' Composition into the Scene Window.
- Double click the 'Reference' Composition in the Scene Window to load it into the Attribute Editor.
- Under the Shape tab, check Artboard.
- Select the Reference Composition in the Scene Window and hit Cmd/Ctrl + D to duplicate it.
- Move it in the Viewport.
- Double click either Pre-Composition and open the Overrides tab.
- Change the Fill Color.
- File > Save (
main.cv).
Edit the 'reference' Scene:
- Right click the reference Asset's parent and choose
Open Reference File.... - Select the Shape's Stroke tab and enable Stroke.
- File > Save.
Reload the 'main' Scene:
- File > Open Recent > select the
main.cvfile saved on step 14.
Both Pre-Compositions are updated to include the change made to the Shape's Stroke within the Reference.
Project Settings
While not essential, it's recommended to use Project Settings when working with references to ensure file paths are relative to other assets.
Nulls and Falloffs will not appear or render when included within Reference files. Shapes set as Guide Layers (see Advanced tab) can be used as a replacement where 'helpers' that are visible but do not render are required for positioning/registration purposes.